
Page 15 - Bendix Air disc brake-01
P. 15
5.2 Adjuster check
WARNING!
Before starting repair work, block the
wheels to ensure that the vehicle cannot
roll away, before releasing the park brake. 23 37
See Page 36 for full Safety Guidelines.
Remove wheel.
The caliper assemply should be pushed inboard on
its guide pins. Using a suitable tool, press the inbo-
ard pad (12) away from the Tappets and check
Tappet and inboard pad backplate - it should be bet-
M+P-KN-039
ween 0.02in. (0.5mm) & 0.04in. (1.0mm). If the running
clearance is too small or large, the adjuster may not be
functioning correctly and should be checked as follows.
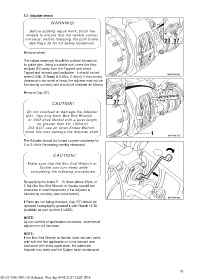
Remove Cap (37).
23
37
CAUTION!
Do not overload or damage the Adjuster
(23). Use only 8mm Box End Wrench
or 1/4Ó" drive Socket with a lever length
no greater than 4in. (100mm).
DO NOT use an Open Ended Wench
since this may damage the Adjuster shaft.
1
M+P-KN-015
The Adjuster should be turned counter-clockwise for
2 or 3 clicks (increasing running clearance).
CAUTION!
Make sure that the Box End Wrench or
Socket can turn freely while
completing the following procedures.
By applying the brake 5 - 10 times (about 30psi, or
2 Bar) the Box End Wrench or Socket should turn
clockwise in small increments if the Adjuster is
functioning correctly (see notes below).
M+P-KN-043
If Pads are not being changed, Cap (37) should be
replaced having lightly greased it with Renolit HLT2
(available as part number II14525).
NOTE:
As the number of applications increases, incremental
adjustment will decrease.
NOTE:
If the Box End Wrench or Socket does not turn, turns
only with the first application or turns forward and
backward with every application, the automatic
Adjuster has failed and the Caliper must be replaced.
15
SD-23-7550: 000: US: Released: Wed Apr 09 01:32:27 CEST 2014: