
Page 32 - Bendix Air disc brake-01
P. 32
Assemply on the Caliper and Carrier removed
from the axle:
IMPORTANT!
Replace the Rubber
Boot (10) by the Steel Cap (10a) when
replacing the Sleeve (5), the
O-Ring (31a) and the Screw (40)
at the same time. Replace only on the
recommendation of the Axle or Vehicle
manufacturer. On SB 6... (19.5“) only
permissible after manufacturing date
A0026. (see type plate).
Put the Caliper on the Carrier.
IMPORTANT!
9
Special threaded Screw (40) and Steel
Cap (10a) as well as the O-Ring (31a)
must be renewed whenever Screw (40)
has been removed.
Screw-in Caliper Bolts (39 and 40) and tighten to 5
+18 +25
210 ft. lbs. (285 Nm).
FD00112
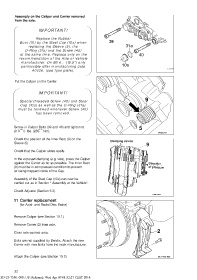
Check the position of the Inner Boot (9) on the
Clamping device
Sleeve (5).
9
Check that the Caliper slides easily.
In the exposed clamping (e.g. vice), press the Caliper
against the Carrier as far as possible. The Inner Boot Direction
(9) must be in compressed condition to prevent of pressure
air being trapped inside of the Cap.
Assembly of the Steel Cap (10a) can now be
carried out as in Section “ Assembly at the Vehicle“.
Check Adjuster (Section 5.2).
FD00110EN
11 Carrier replacement
(for Axial- and Radial Disc Brake)
Remove Caliper (see Section 10.1).
Remove Carrier (2) from axle.
2
Clean axle contact area.
Bolts are not supplied by Bendix. Attach the new
Carrier with new bolts from the truck manufacturer.
Attach the Caliper (see Section 10.2) M+P-KN-036
32
SD-23-7550: 000: US: Released: Wed Apr 09 01:32:27 CEST 2014: