
Page 21 - KNORR Pneumatic Disc Brake
P. 21
5
Functional and Visual Check
5.2 Adjuster Check
Before starting work, ensure that the wheels are
chocked and the vehicle cannot roll away.
Ensure that service brake and parking brake,
as well as bus stop temporary hold brake, if
fitted, are in the released condition.
Remove wheel (refer to vehicle manufacturer’s recommen-
dations).
5.2.1. If, due to the orientation of the caliper on the axle,
there is no danger of the brake pads falling out, remove the
pad retainer (11) (see Section 6.1.2).
5.2.2. Push and pull caliper three times in axial direction 5.2.3 - Push caliper inboard
to assess any existing air gap (see Section 5.3.1).
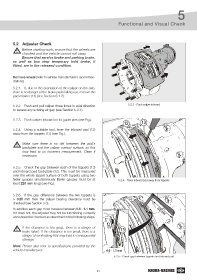
5.2.3. Push caliper inboard on its guide pins (see Fig.).
12 13
5.2.4. Using a suitable tool, lever the inboard pad (12)
away from the tappets (13) (see Fig.).
Make sure there is no dirt between the pad‘s
backplate and the caliper contact surface, as this
may lead to an incorrect measurement. Clean if
necessary.
5.2.5. Check the gap between each of the tappets (13)
and inboard pad backplate (12). This must be measured
over the whole tappet surface of both tappets using two
feeler gauges simultaneously (feeler gauges must be at 5.2.4 - Press inboard pad away from tappets
least 220 mm long) (see Fig.).
5.2.6. If the gap difference between the two tappets is
> 0 25 mm then the caliper bearing clearance must be
checked (see Section 5.3).
In addition each gap must measure between 0 6 - 1 1 mm
If it does not, the adjuster may not be functioning correctly 220 mm
and should be checked as described in the following steps.
If the clearance is too great, there is a danger of 13
brake failure. If the clearance is too small, there is a
danger of overheating that may lead to consequential
damage.
Note: Please also refer to specifications provided by the
vehicle manufacturer. 0.6 - 1.1 mm
5.2.5 - Check gap between tappets and inboard pad
21