
Page 22 - Bendix Air disc brake-01
P. 22
6 Pad replacement
(for “Axial- and Radial Disc Brake”)
WARNING!
Before starting repair work, block the
wheels to ensure that the vehicle cannot
roll away, before releasing the park brake.
See Page 36 for full Safety Guidelines.
6.1 Pad removal
Take the wheel off (refer to Vehicle Manufacturer’s
recommendations).
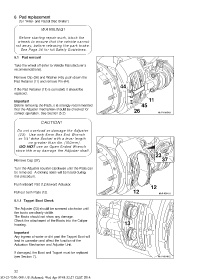
Remove Clip (26) and Washer (45), push down the
Pad Retainer (11) and remove Pin (44).
44
If the Pad Retainer (11) is corroded, it should be
replaced.
11
Important
Before removing the Pads, it is strongly recommended 45
that the Adjuster mechanism should be checked for 26
correct operation. See Section (5.2) M+P-KN-010
CAUTION!
Do not overload or damage the Adjuster
(23). Use only 8mm Box End Wrench
or 1/4” drive Socket with a lever length
no greater than 4in. (100mm).
DO NOT use an Open Ended Wrench
since this may damage the Adjuster shaft.
23
Remove Cap (37). 37
Turn the Adjuster counter-clockwise until the Pads can
be removed. A clicking noise will be heard during
this procedure.
Push inboard Pad (12) toward Actuator.
12
Pull out both Pads (12). 12 M+P-KN-011
6.1.1 Tappet Boot Check
The Adjuster (23) should be screwed clockwise until
the boots are clearly visible.
The Boots should not show any damage.
Check the attachment of the Boots into the Caliper
housing. 13
Important
Any ingress of water or dirt past the Tappet Boot will
lead to corrosion and affect the function of the
Actuation Mechanism and Adjuster Unit.
If damaged, the Boot and Tappet must be replaced
(see Section 7). M+P-KN-012
22
SD-23-7550: 000: US: Released: Wed Apr 09 01:32:27 CEST 2014: