
Page 55 - KNORR Pneumatic Disc Brake
P. 55
12
Brake Actuator Replacement
12.4 Fitting of Knorr-Bremse Spring Brake
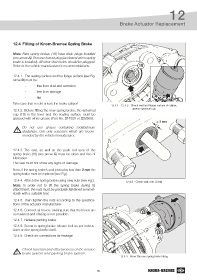
Note: New spring brakes (18) have drain plugs installed
(see arrow A). Remove lowest plug (as viewed when spring
brake is installed). All other drain holes should be plugged.
Refer to the vehicle manufacturer’s recommendations. 19
12.4.1. The sealing surface and the flange surface (see Fig.
arrow B) must be:
- free from dust and corrosion
- free from damage
B
- flat A
Take care that no dirt enters the brake caliper!
12.4.1 - 12.4.2 - Check seal and flange surface of caliper,
12.4.2. Before fitting the new spring brake, the spherical grease spherical cup
cup (19) in the lever and the sealing surface must be
greased with white grease (Part No. II14525 or II32868).
> 3 mm
Do not use grease containing molybdenum
disulphate. Use only actuators which are recom-
mended by the vehicle manufacturer.
12.4.3. The seal, as well as the push rod area of the
spring brake (18) (see arrow C) must be clean and free of C
lubrication.
The seal must not show any signs of damage.
Note, if the spring brake’s seal protrudes less than 3 mm the
spring brake must be replaced (see Fig.).
12.4.4. Attach the spring brake using new nuts (see Fig.). 12.4.3 - Check seal, min. 3 mm
Note: In order not to tilt the spring brake during its
attachment, the nuts must be gradually tightened symmet-
rically with a suitable tool.
12.4.5. Then tighten the nuts according to the specifica-
tions of the actuator manufacturer.
12.4.6. Connect air hoses, making sure that the hoses are
not twisted and chafing is not possible.
12.4.7. Release parking brake.
12.4.8. Screw in spring brake release bolt as per instruc-
tions on the spring brake itself.
12.4.9. Check air connections for leakage.
Check function and effectiveness of the service
brake system and parking brake system.
12.4.4 - Knorr-Bremse spring brake fitting
55