
Page 53 - KNORR Pneumatic Disc Brake
P. 53
12
Brake Actuator Replacement
12 Brake Actuator Replacement
Note: All references to brake actuators (brake chambers
and spring brakes) in this section refer to Knorr-Bremse 18
brake actuators. For other brake actuator manufacturers,
follow their respective instructions.
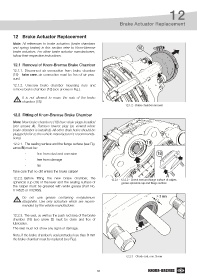
12 1 Removal of Knorr-Bremse Brake Chamber
12.1.1. Disconnect air connection from brake chamber
(18) – take care, air connection must be free of air pres-
sure!
12.1.2. Unscrew brake chamber mounting nuts and
remove brake chamber (18) (see arrows in Fig.).
It is not allowed to reuse the nuts of the brake
chamber (18).
12.1.2 - Brake chamber removal
12.2 Fitting of Knorr-Bremse Brake Chamber
Note: New brake chambers (18) have drain plugs installed
(see arrows A). Remove lowest plug (as viewed when
brake chamber is installed). All other drain holes should be
plugged (refer to the vehicle manufacturer’s recommenda-
tions).
12.2.1. The sealing surface and the flange surface (see Fig. 19
arrow B) must be:
- free from dust and corrosion 18
- free from damage
- flat B
Take care that no dirt enters the brake caliper!
A
12.2.2. Before fitting the new brake chamber, the 12.2.1 - 12.2.2 - Check seal and flange surface of caliper,
spherical cup (19) of the lever and the sealing surface of grease spherical cup and flange surface
the caliper must be greased with white grease (Part No.
II14525 or II32868).
Do not use grease containing molybdenum > 3 mm
disulphate. Use only actuators which are recom-
mended by the vehicle manufacturer.
12.2.3. The seal, as well as the push rod area of the brake
chamber (18) (see arrow C) must be clean and free of
lubrication.
The seal must not show any signs of damage. C
Note, if the brake chamber’s seal protrudes less than 3 mm
the brake chamber must be replaced (see Fig.).
12.2.3 - Check seal, min. 3 mm
53