
Page 54 - KNORR Pneumatic Disc Brake
P. 54
12
Brake Actuator Replacement
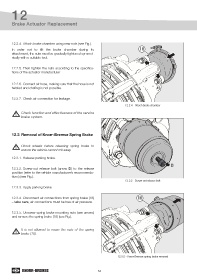
12.2.4. Attach brake chamber using new nuts (see Fig.).
In order not to tilt the brake chamber during its 18
attachment, the nuts must be gradually tightened symmet-
rically with a suitable tool.
12.2.5. Then tighten the nuts according to the specifica-
tions of the actuator manufacturer
12.2.6. Connect air hose, making sure that the hose is not
twisted and chafing is not possible.
12.2.7. Check air connection for leakage.
12.2.4 - Attach brake chamber
Check function and effectiveness of the service
brake system.
12.3 Removal of Knorr-Bremse Spring Brake
Chock wheels before releasing spring brake to
ensure the vehicle cannot roll away.
12.3.1. Release parking brake.
D
12.3.2. Screw-out release bolt (arrow D) to the release
position (refer to the vehicle manufacturer’s recommenda-
tions) (see Fig.).
12.3.2 - Screw out release bolt
12.3.3. Apply parking brake.
12.3.4. Disconnect air connections from spring brake (18) 18
– take care, air connections must be free of air pressure.
12.3.5. Unscrew spring brake mounting nuts (see arrows)
and remove the spring brake (18) (see Fig.).
It is not allowed to reuse the nuts of the spring
brake (18).
12.3.5 - Knorr-Bremse spring brake removal
54