
Page 40 - KNORR Pneumatic Disc Brake
P. 40
8
Caliper Replacement
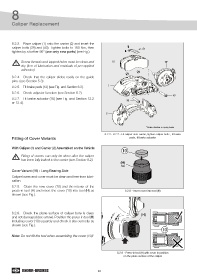
8.2.3. Place caliper (1) onto the carrier (2) and insert the
caliper bolts (39) and (40). Tighten bolts to 180 Nm, then
tighten by a further 90° (use only new parts) (see Fig.).
Screw threads and tapped holes must be clean and 12 18*
dry (free of lubrication and residuals of pre-applied
adhesive).
8.2.4. Check that the caliper slides easily on the guide
pins. (see Section 5.3)
8.2.5. Fit brake pads (12) (see Fig. and Section 6.2). 1
8.2.6. Check adjuster function (see Section 5.2).
40
8.2.7. Fit brake actuator (18) (see Fig. and Section 12.2 39
or 12.4).
2
* Brake chamber or spring brake
8.2.3 - 8.2.7 - Fit caliper onto carrier, tighten caliper bolts , fit brake
Fitting of Cover Variants pads, fit brake actuator
With Caliper (1) and Carrier (2) Assembled on the Vehicle:
10
Fitting of covers can only be done after the caliper
has been fully bolted to the carrier (see Section 8.2).
(H)
T26
Cover Variant (10) - Long Bearing Side
Caliper bores and cover must be clean and free from lubri-
cation.
8.2.8. Clean the new cover (10) and the interior of the
press-in tool (H) and insert the cover (10) into tool (H) as 8.2.8 - Insert cover into tool (H)
shown (see Fig.).
8.2.9. Check the plane surface of caliper bore is clean (H)
and not damaged (see arrow). Position the press-in tool (H)
including cover (10) squarely and check it sits correctly as
shown (see Fig.).
10
Note: Do not tilt the tool when assembling the cover (10)!
8.2.9 - Press-in tool (H) with cover in position
on the plane surface of the caliper
40